
TL;DR
In this article, you will learn how to build an agent-native research canvas app that combines human-in-the-loop capabilities using Langraph, CopilotKit, and Tavily.
Before we jump in, here is what we will cover:
- What are AI agents?
- Building and visualizing a LangGraph AI agent using LangGraph Studio
- Building UI for a LangGraph AI agent using CopilotKit
Here’s a preview of the application we’ll be building:
What are AI Agents?
In simpler terms, AI Agents are autonomous software programs that can perform tasks, make decisions, and interact with their environment using artificial intelligence.
In this context, they are systems that can conduct research, process information, and engage with humans during execution to ensure reliability and trustworthiness.
You can read more about AI Agents here on CopilotKit docs.

What is CopilotKit
CopilotKit is an open source, full-stack framework for building user-interactive agents and copilots. It enables your agents to take control of your application, communicate what it's doing, and generate a completely custom UI.

Prerequisites
To fully understand this tutorial, you need to have a basic understanding of React or Next.js.
We'll also make use of the following:
- Python - a popular programming language for building AI agents with LangGraph; make sure it is installed on your computer.
- LangGraph - a framework for creating and deploying AI agents. It also helps to define the control flows and actions to be performed by the agent.
- OpenAI API Key - to enable us to perform various tasks using the GPT models; for this tutorial, ensure you have access to the GPT-4 model.
- Tavily AI - a search engine that enables AI agents to conduct research and access real-time knowledge within the application.
- CopilotKit - an open-source copilot framework for building custom AI chatbots, in-app AI agents, and text areas.
- Docker - a platform for developing, shipping, and running applications in containers.
Building and Visualizing a LangGraph AI agent
In this section, you will learn how to build and start a LangGraph agent using Docker and visualize its workflow using LangGraph Studio.
Let’s jump in.
First, start by cloning the agent-native research canvas app repository, which contains code for a Python-based Langraph agent:
The repository contains two folders: the agent and the front end. To start the agent, navigate to the agent directory.
Then install all the agent dependencies using pip.
Next, create a .env file in the agent directory. Then add OpenAI, Tavily, and LangSmith API keys into the environment variables.
If you open the agent/graph.py file, it defines a MasterAgent class that conducts a research workflow.
It uses a directed graph (StateGraph) to manage states and transitions between the LangGraph AI agent nodes, tool execution, and human feedback.
The workflow is designed to assist in generating research reports by gathering data, proposing outlines, and writing sections—all while allowing human feedback via a front-end integration using CopilotKit.
To start the Langraph AI agent, open the Docker app and run the following command to start the agent.
Once the LangGraph API server has started, navigate to the LangGraph Studio using the LangGraph Studio link provided. Note the API URL from the output (e.g., http://localhost:8123). We will use it to connect the agent to the front end using CopilotKit Cloud.

After that, the LangGraph agent will open on the LangGraph studio, and you can visualize it, as shown below.
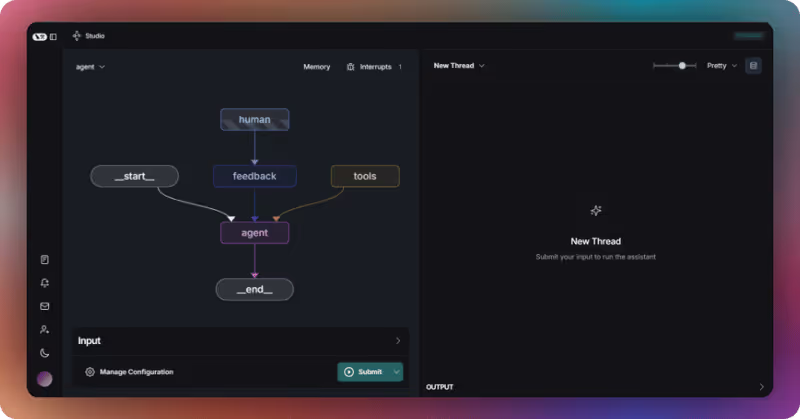
To test the LangGraph agent, add a message to the messages state variable and click the Submit button.

The agent will then process the input by following the defined workflow through the connected nodes and respond to your message in a thread, as shown below.

Before we continue, let’s talk about a key concept in agentic copilots called Human-in-the-Loop (HITL). HITL allows agents to request human input or approval during execution in order to make AI systems reliable and trustworthy.
You can read more about Human-in-the-Loop here on CopilotKit Docs.

In this case, you can add HITL to the agent by clicking one of the nodes and marking the Interrupt After checkbox, as shown below.

Then add another message, such as “research about AI models,” to the messages state variable and click the Submit button. The agent will start researching AI models, and once it is done, it will ask you to review the sections and provide your feedback or any specific changes you would like to make, as shown below.

Add a “yes” message to the messages state variable and click the Submit button. The agent will process the message and provide you with the outline proposal for the report on AI models. Then it will ask you if you would like to approve the outline or if there are any changes you would like to make, as shown below.

Reply with the “I would like to approve the outline” message and click the submit button. Then the agent will compile a report on AI models grouped in different sections and finish the research process, as shown below.

Now that we have learned how to visualize and test a LangGraph AI agent using LangGraph Studio, let’s see how we can add a frontend UI to interact with it.
Building UI for LangGraph Agent using CopilotKit
In this section, you will learn how to connect your LangGraph AI agent to the CopilotKit frontend UI using the CopilotKit cloud.
Let’s get started.
Step 1: Create a tunnel for a LangGraph AI agent
To create a tunnel to the LangGraph AI agent, use the command below so Copilot Cloud can connect to it. Remember the API URL I told you to note when starting the agent; use the port number provided. In my case, the port number is 8123.
Select a project, and the tunnel should be live and connected to Copilot Cloud, as shown below.

Then navigate to the frontend folder.
After that, install the frontend dependencies using pnpm.
Next, create a .env file in the frontend directory. Then add OpenAI, Copilot Cloud, and LangSmith API keys into the environment variables.
Then start the app using the command below.
Navigate to http://localhost:3000/ and you should see the LangGraph AI agent frontend up and running

Let’s now see how to build UI for the LangGraph AI agent using CopilotKit.
Step 2: Setup CopilotKit Provider
To set up the CopilotKit Provider, the <CopilotKit> component must wrap the Copilot-aware parts of your application. For most use cases, it's appropriate to wrap the CopilotKit provider around the entire app, e.g., in your layout.tsx, as shown below in the frontend/src/app/layout.tsx file
Step 3: Choose a Copilot UI
To set up your Copilot UI, first import the default styles in your root component (typically layout.tsx).
import "@copilotkit/react-ui/styles.css";
Copilot UI ships with a number of built-in UI patterns; choose whichever one you like from CopilotPopup, CopilotSidebar, CopilotChat, to Headless UI.

In this case, we will use CopilotChat defined in the src/components/chat.tsx file.
The chat component is then imported and used in the src/app/page.tsx file. The chat is then rendered on the frontend UI, as shown below.

Step 4: Creating a shared state between your UI and LangGraph AI agent
CoAgents maintain a shared state that seamlessly connects your UI with the agent's execution. This shared state system allows you to:
- Display the agent's current progress and intermediate results
- Update the agent's state through UI interactions
- React to state changes in real-time across your application
You can learn more about CoAgents’ shared state here on CopilotKit docs.

To create a shared state between your UI and LangGraph AI agent, first, you need to define the agent state and emit it to the front end, as shown in the agent/graph.py file.
Then use the CopilotKit useCoAgent hook to share the LangGraph AI agent state with your frontend UI in the src/components/research-context.tsx file. The useCoAgent hook allows you to share state bidirectionally between your application and the agent.
Next, render the agent's state in the chat UI. This is useful for informing the user about the agent's state in a more in-context way. To do this, you can use the useCoAgentStateRender hook in the src/app/page.tsx file.
Then navigate to http://localhost:3000/, add “research AI models” to the chat, and press “Enter.” You should see the LangGraph AI agent state rendered in the chat UI, as shown below.

Step 5: Adding Human-in-the-loop breakpoint in your frontend UI
To allow the LangGraph agent to request human input or approval during execution in the chat UI, use the CopiloKit useCopilotKitAction hook named review_proposal in the src/app/page.tsx file.
Then navigate to http://localhost:3000/. Once the LangGraph agent is done researching about AI models, it will ask you to approve the proposal, as shown below.

Select the sections you want, add some remarks, and click the Approve Proposal button. The LangGraph AI agent will start writing the research report on AI models.

Step 6: Streaming LangGraph AI agent Response in the UI
To stream the research report content, use the useStreamingContent hook defined in the src/lib/hooks/useStreamingContent.ts file in the src/app/page.tsx file.
You should see the research content streaming on the right side, as shown below.

Conclusion
We covered a lot in this tutorial. I hope you learned how to build UI for an agentic copilot for your application with CopilotKit and also learned how to perform state changes in real-time and implement the human-in-the-loop concept.
Check out the full source code on GitHub here
Follow CopilotKit on Twitter and say hi, and if you'd like to build something cool, join the Discord community.
Get notified of the latest news and updates.

.png)
%20Using%20A2A%20%2B%20AG-UI%20(8).png)
.png)
